Usage Guide
This guide walks you through the complete workflow for both widgets — from creating animation blueprint assets to seeing typewriter effects in your game. Everything is done in Blueprint, no C++ required.
Using Preset Animations (Recommended)
Texturge ships with 9 ready-to-use animation presets. You can use them directly without creating an Animation Blueprint from scratch.
Available Presets
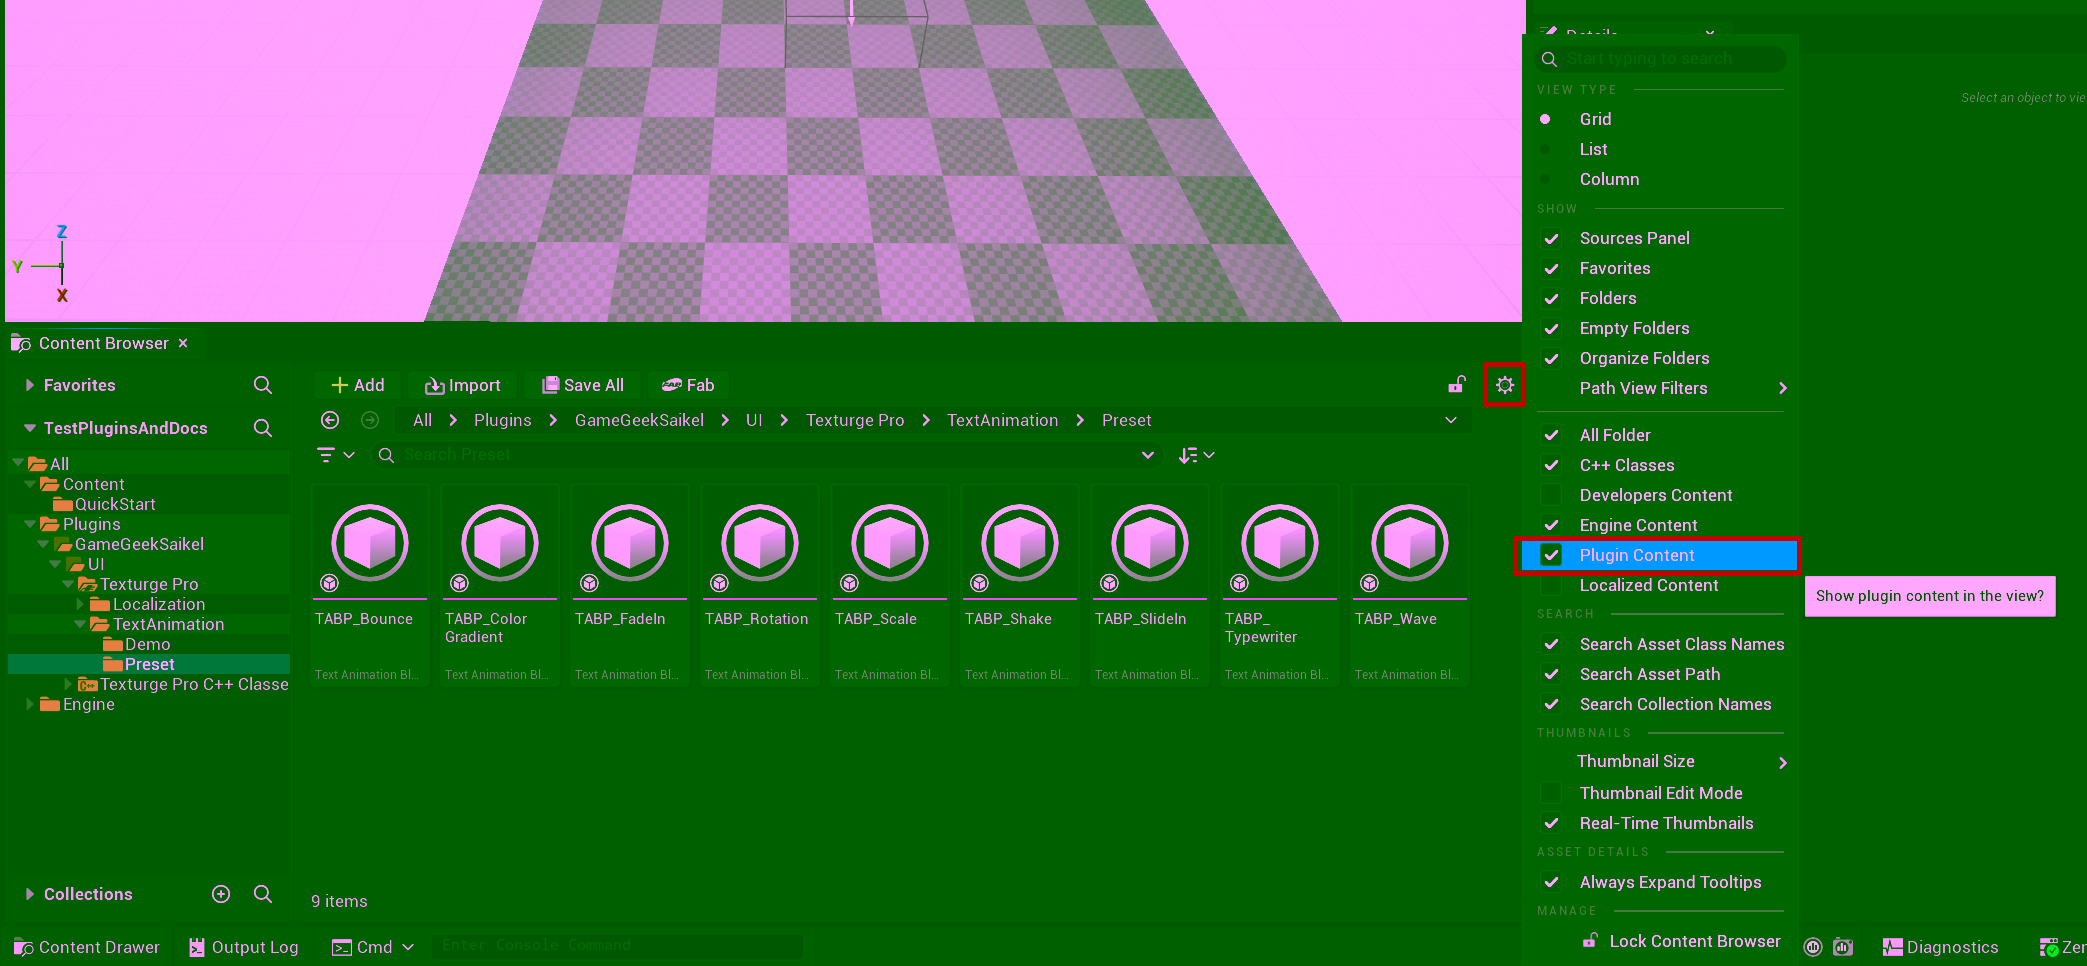
Preset assets are located in the plugin’s Content folder under TextAnimation/Presets/.
NOTE
By default, the Content Browser hides plugin content. Click the Settings menu in the top-left of the Content Browser and check Plugin Content to reveal Texturge’s presets and demo assets under
Plugins/GameGeekSaikel/UI/Texturge Pro/.
| Preset Asset | Effect |
|---|---|
TABP_FadeIn | Fade In — characters fade from opacity 0 to fully visible |
TABP_Typewriter | Typewriter — sequential character reveal like a terminal |
TABP_SlideIn | Slide In — characters slide into place from above |
TABP_Scale | Scale — characters expand from small to normal size |
TABP_Bounce | Bounce — characters spring into position elastically |
TABP_Shake | Shake — characters vibrate horizontally/vertically then settle |
TABP_Wave | Wave — characters follow a wave-like displacement curve |
TABP_ColorGradient | Color Gradient — character color transitions over time |
TABP_Rotation | Rotation — characters rotate then return to upright |
TIP
Custom assets created in this tutorial use the
TABP_Our_prefix (e.g.TABP_Our_Typewriter) to avoid conflicting with the plugin’s built-in presets.
Using a Preset with the Plain Text Widget
- Browse to
Plugins/GameGeekSaikel/UI/Texturge Pro/TextAnimation/Presets/in the Content Browser - Drag an Animated Text Block into a UMG Widget Blueprint
- In the Details panel, set the
Text Animation Blueprintproperty directly to any preset asset (e.g.TABP_Typewriter) - Check
Auto Play— done
Using Presets with the Rich Text Widget
- Create a Text Animation Data Asset
- In the
Animation Entriesarray, map tag names to preset Animation Blueprints - Assign the Data Asset to the Animated Rich Text Block’s
Animation Data Assetproperty - Use
<anim id="tag-name">...</>inline tags in your text to reference each preset
No need to open the Animation Blueprint Editor at all. The sections below cover creating custom animations from scratch — for cases where presets don’t meet your needs.
Plain Text Typewriter Effect
Use case: UI title entrances, quest descriptions revealed character-by-character, any text needing a single animation effect.
Creating a Text Animation Blueprint
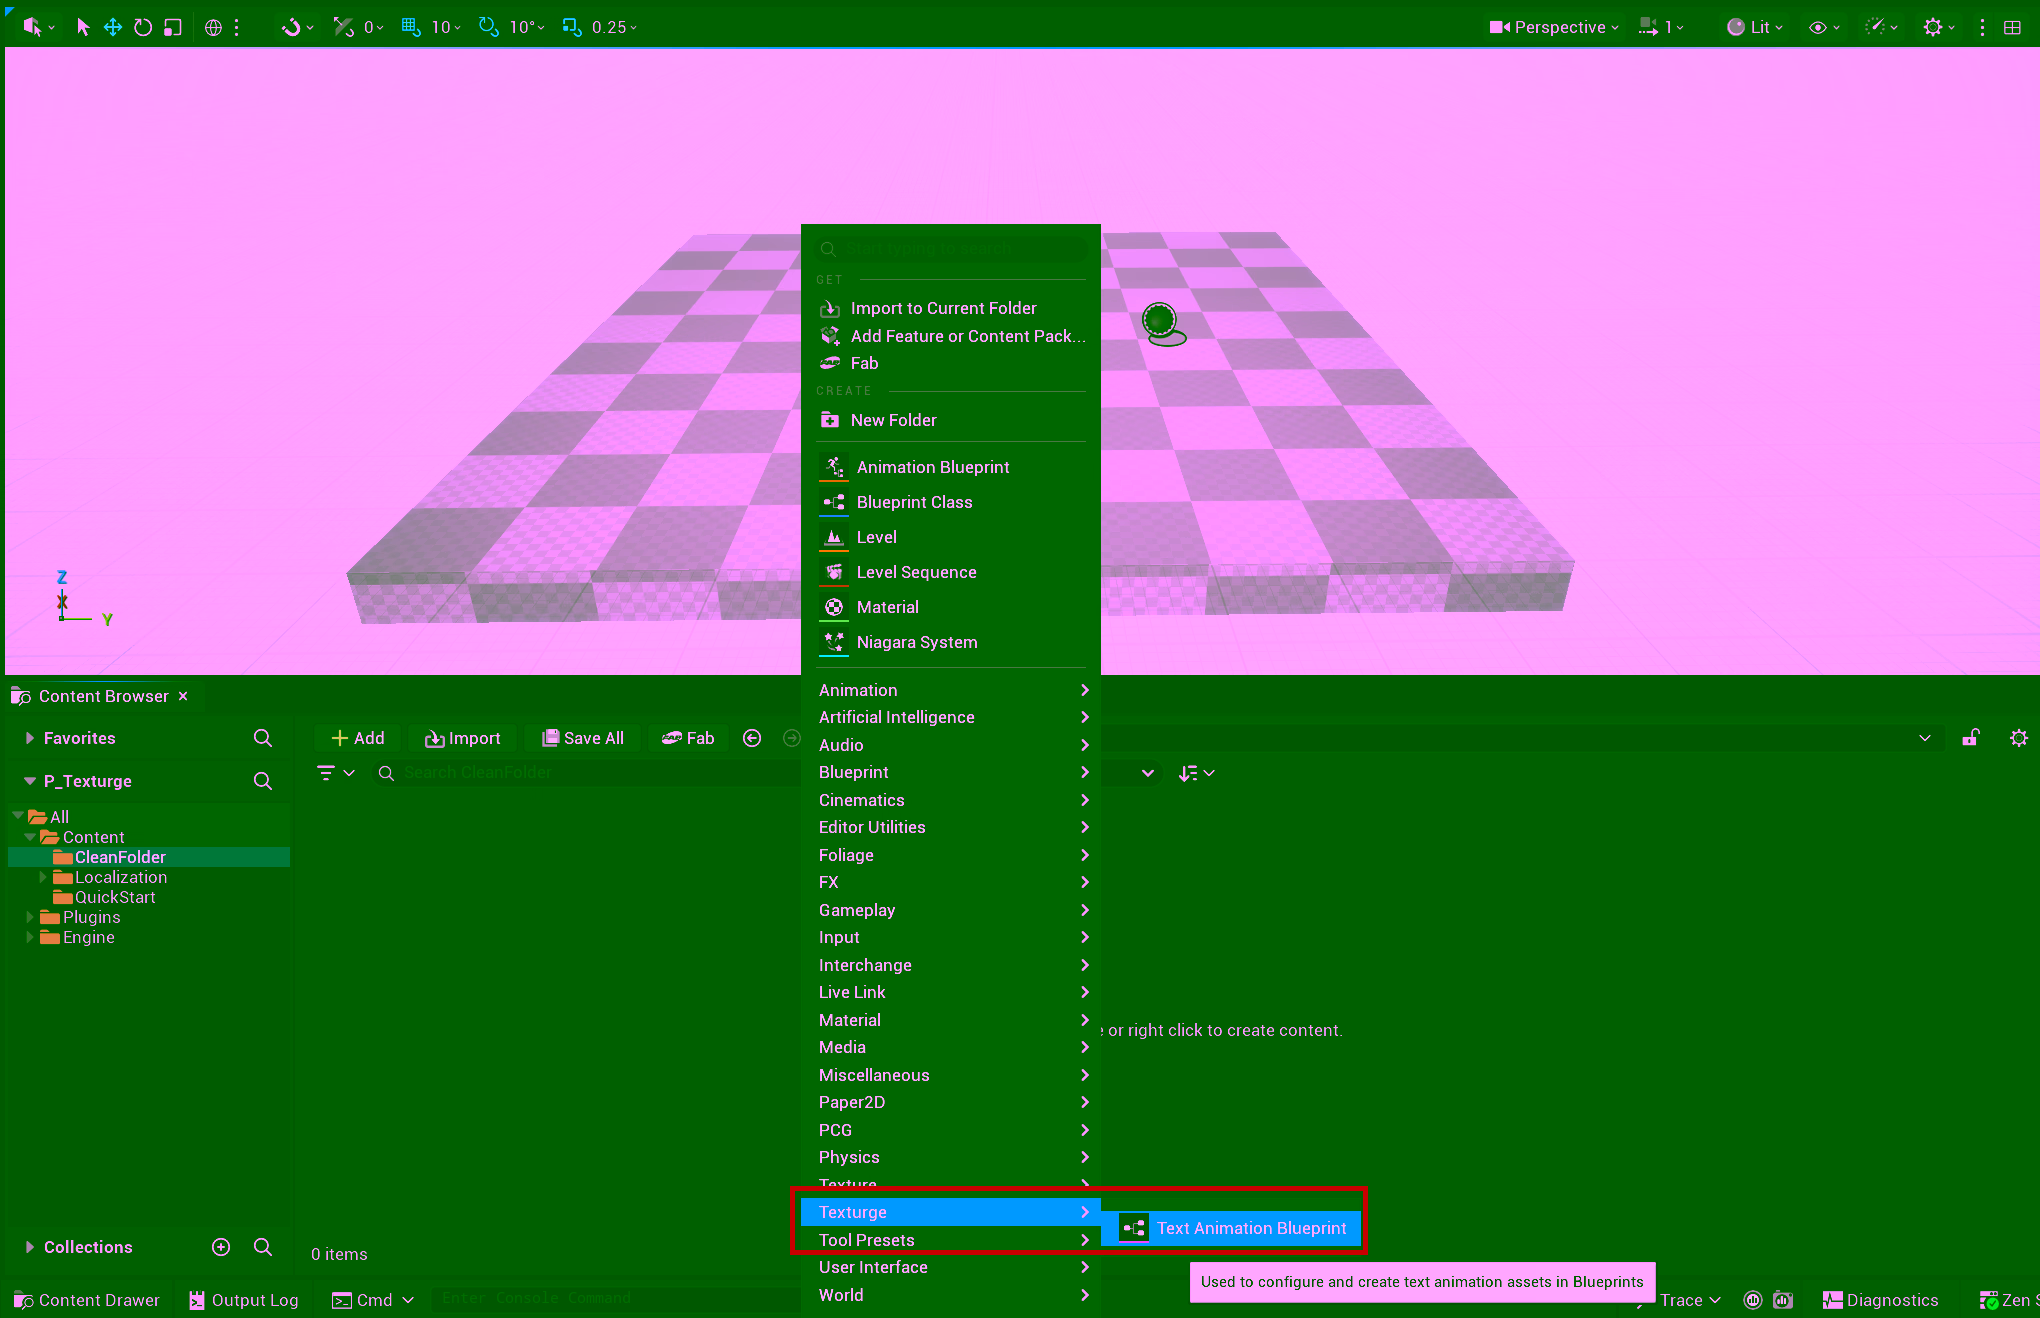
- Right-click in the Content Browser → Texturge → Text Animation Blueprint
- Name it
TABP_Our_Typewriter - Double-click to open the editor
Adding an Opacity Track
The essence of the typewriter effect is controlling character opacity — from invisible to fully visible.
-
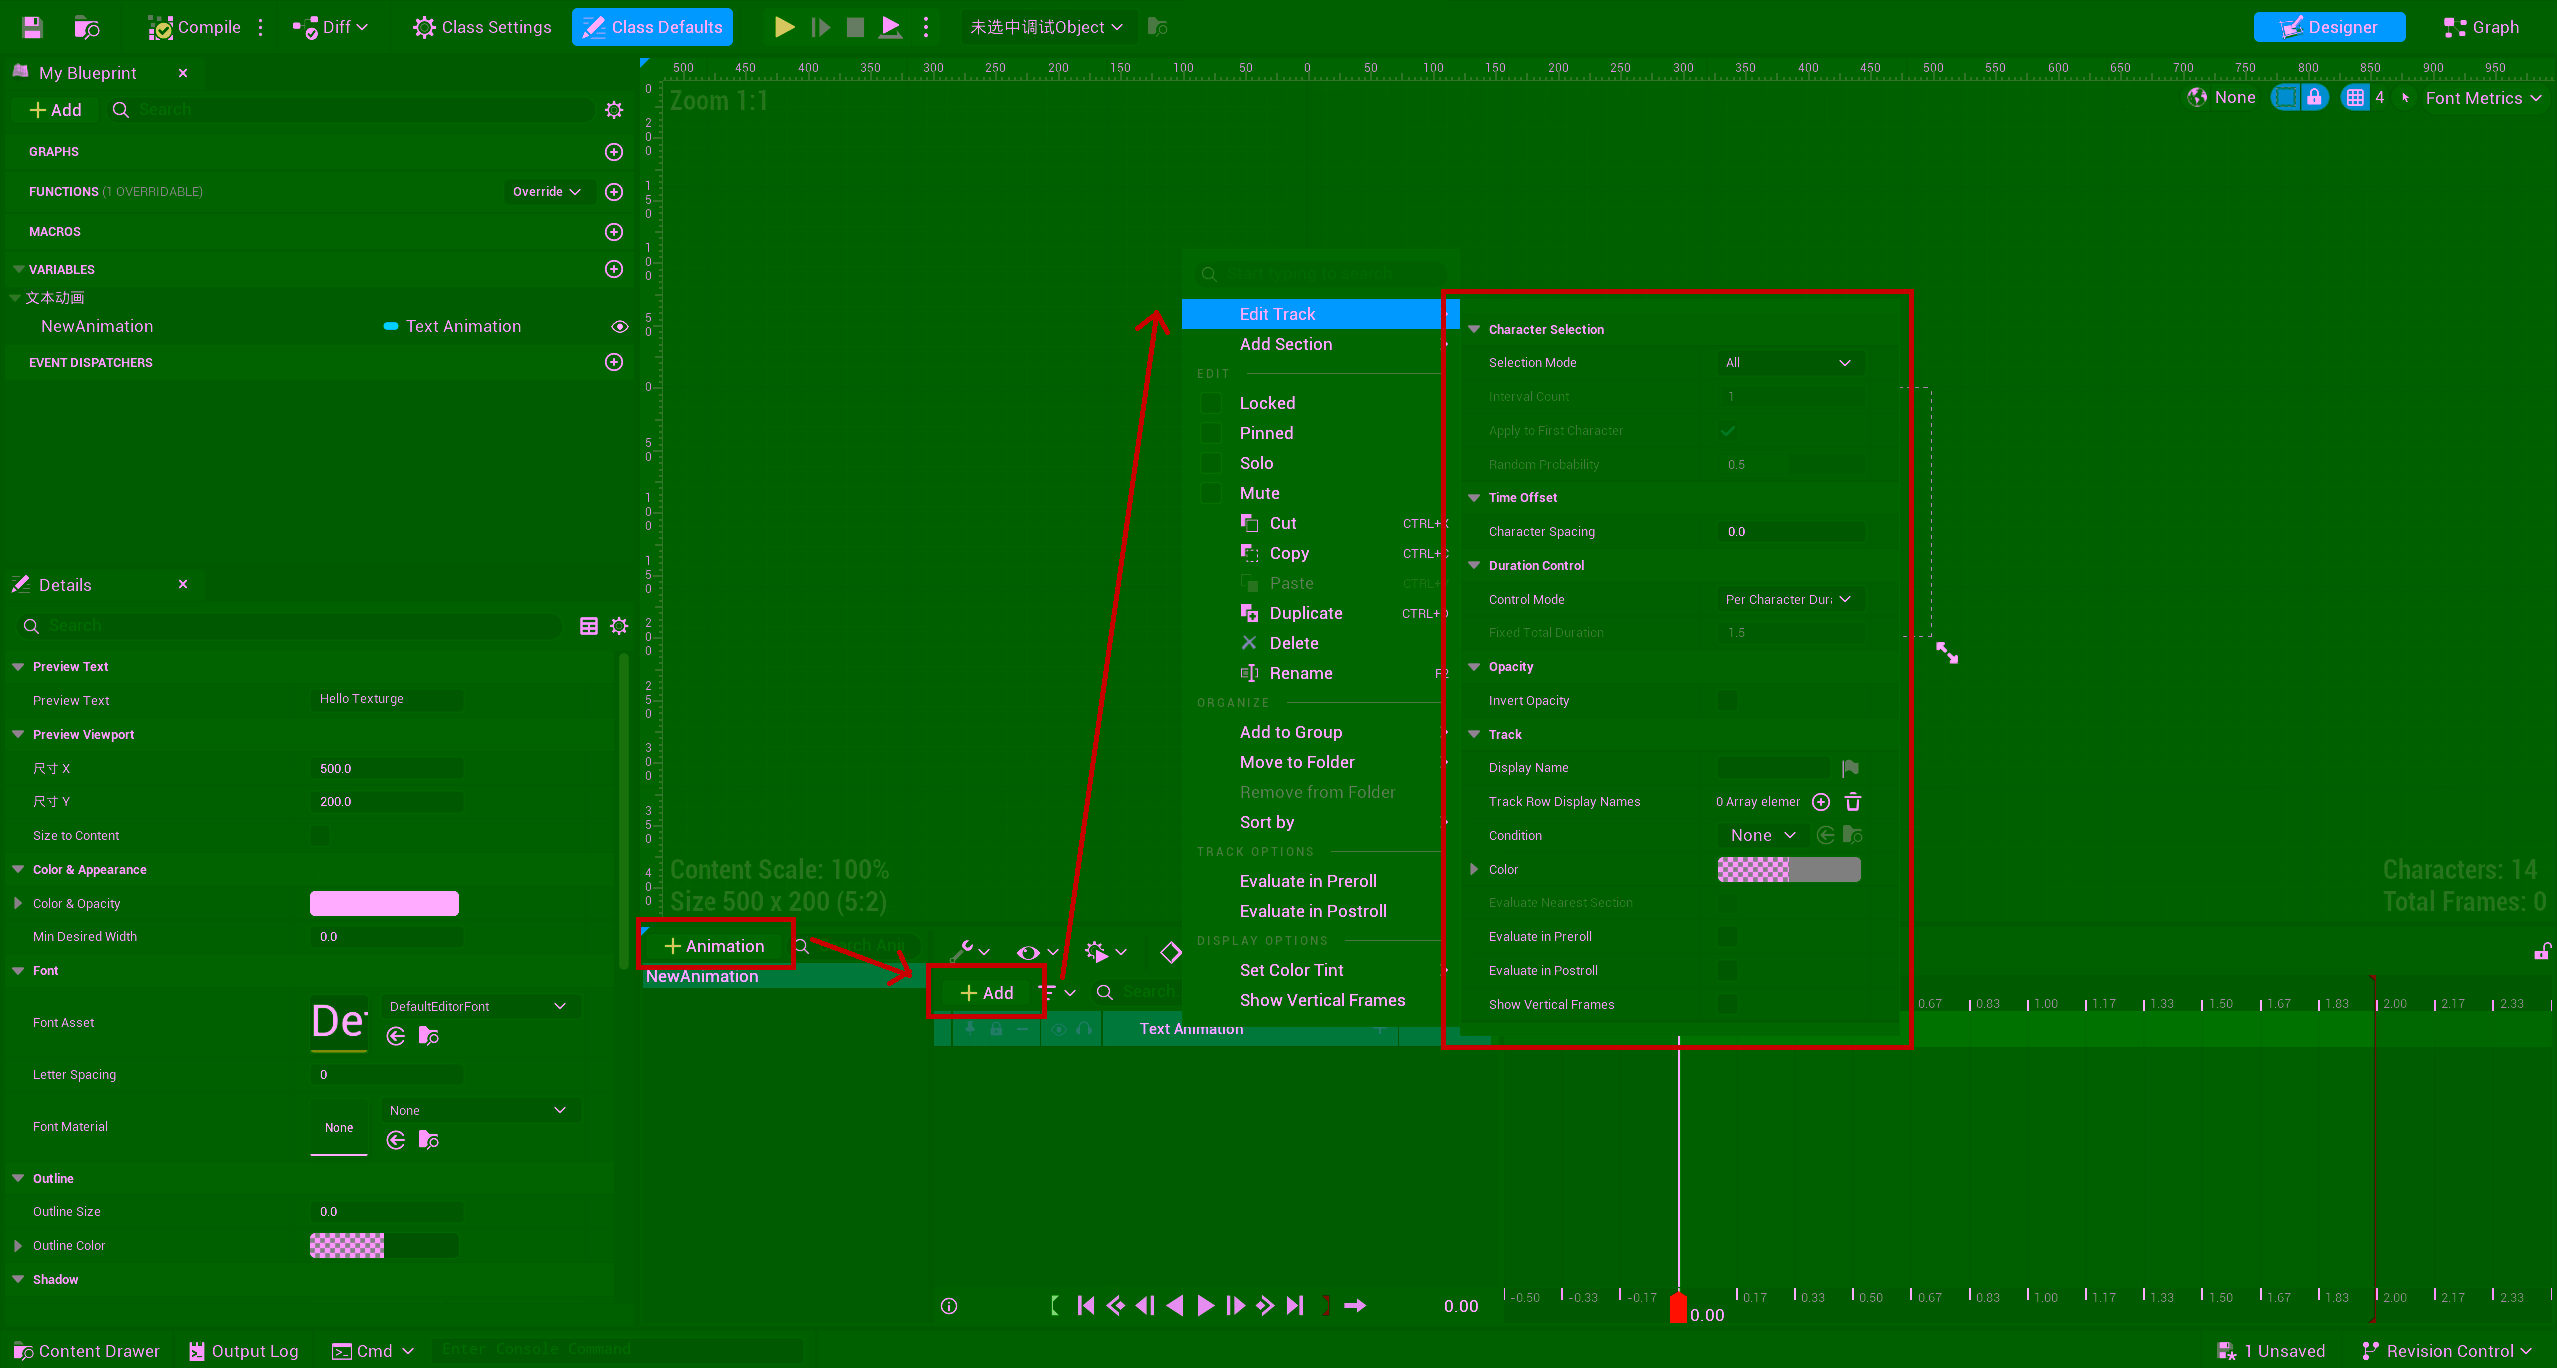
Find the Animation window at the bottom of the editor and click the + Animation button to add an animation
-
In the left Track List panel, click the + button and select Text Animation Track from the dropdown
-
Select the newly added track, right-click, and choose Edit Track in the right panel. Configure the following parameters:
Property Value Description Control ModePer-Character Animation duration is set per character Character Spacing0.20.2s delay between each character Invert OpacitytrueKey: inverts opacity so characters default to hidden -
Click the + button to the right of the Text Animation Track and select Opacity from the dropdown
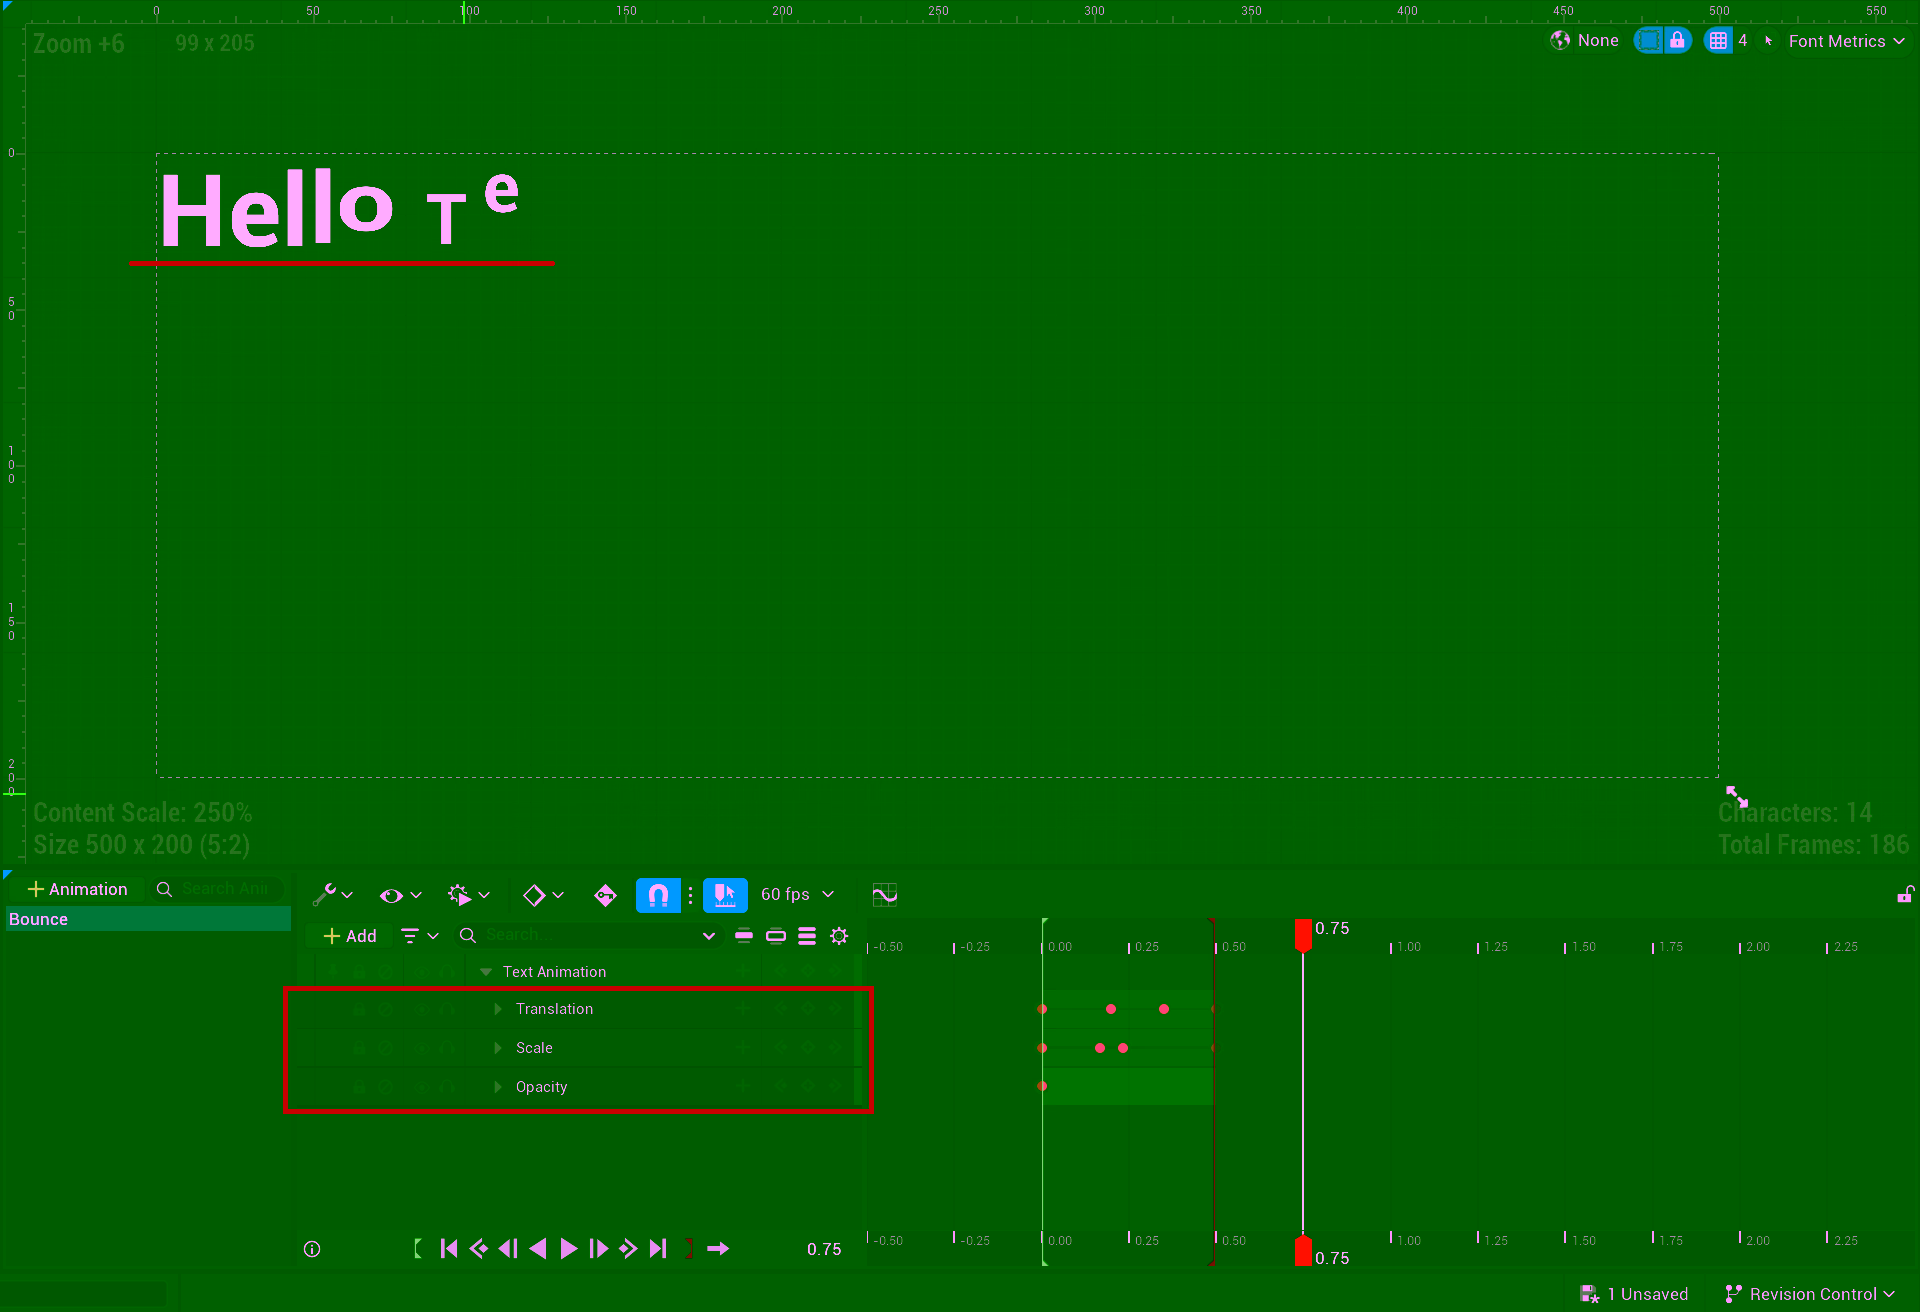
Adding Keyframes
In the Sequencer panel:
-
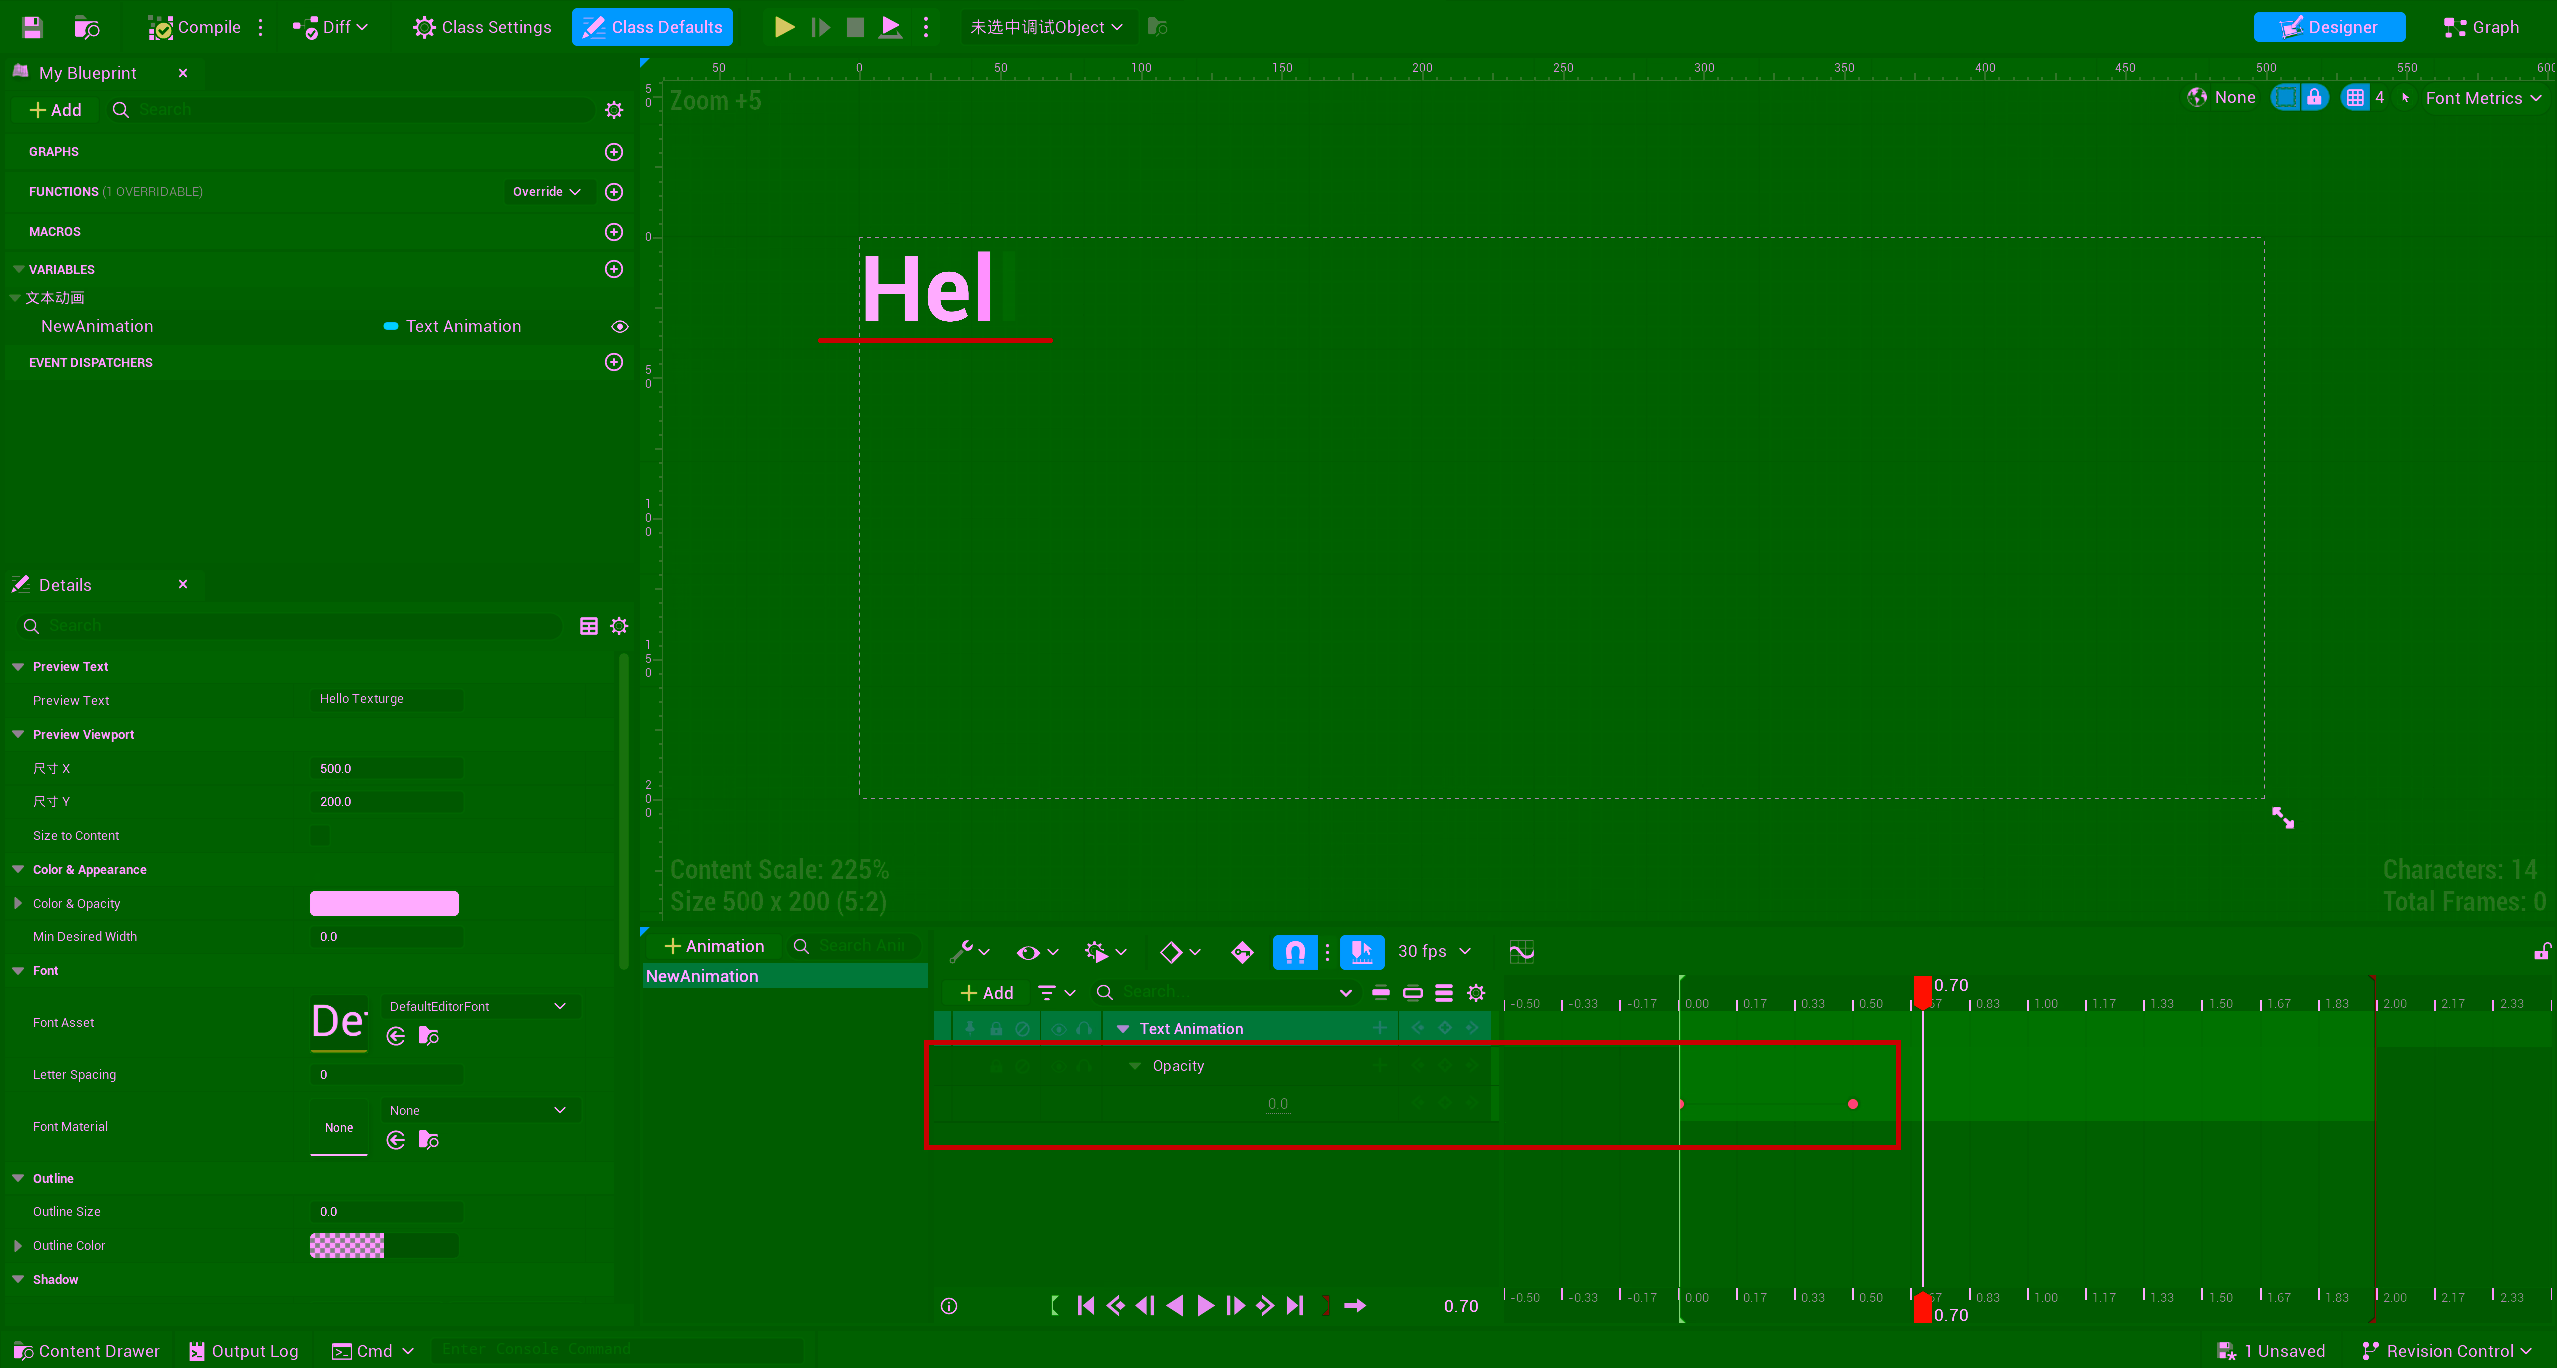
Expand the opacity track you just created
-
Right-click → Add Key on the curve:
Keyframe Time Value Description Key 1 0.0 1.0 Character reveal instant
NOTE
Invert Opacityinverts the entire curve. With a keyframe value of 1.0, the inverted result transitions characters from invisible to fully visible.
Configuring Preview Text
- In the blueprint’s Class Defaults panel, find the
Preview Textproperty - Set it to
Hello Texturge! Welcome to the world of text animation. - Click the Compile button in the toolbar
- Drag the Sequencer playhead in the designer viewport to preview — you should see text “typing” out character by character
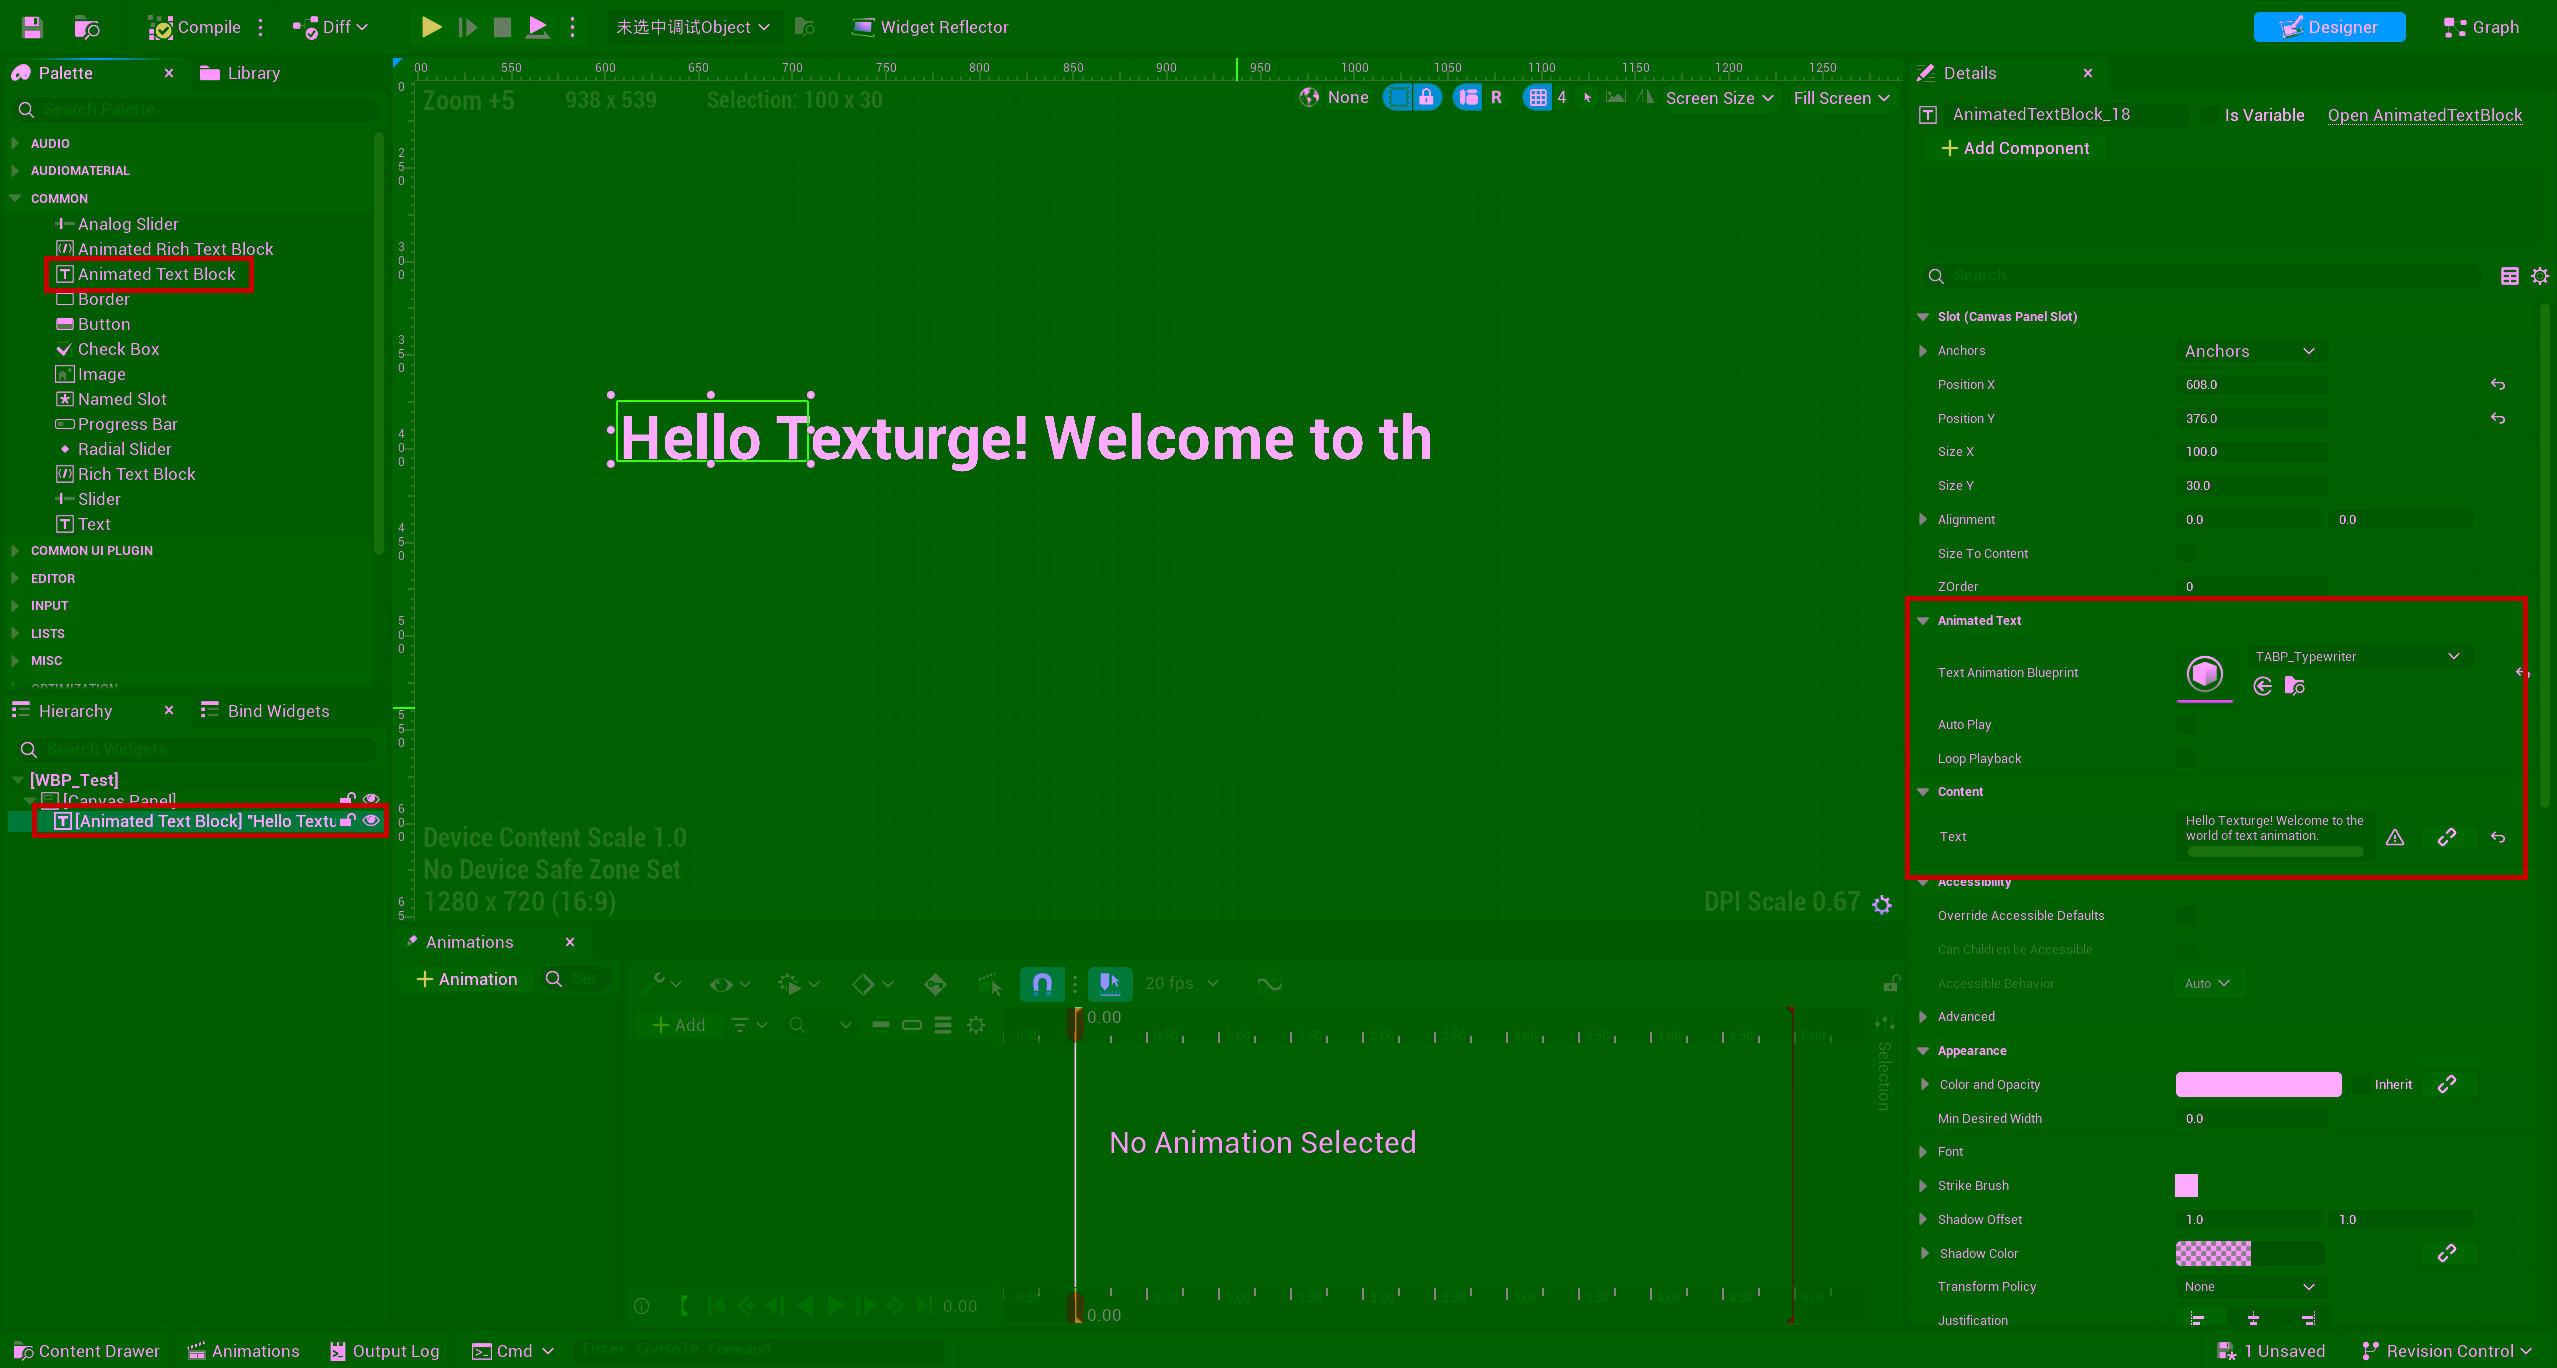
Using in UMG
-
Create or open a UMG Widget Blueprint (e.g., WBP_HUD)
-
In the Palette panel, search for “Animated Text Block” and drag it into the Designer canvas
-
Configure in the Details panel:
Property Value TextHello Texturge! Welcome to the world of text animation.Text Animation BlueprintTABP_Our_TypewriterAuto Playtrue -
Compile and save the Widget Blueprint
-
Add this widget to the Viewport — call
Create Widget+Add to Viewportin PlayerController or GameMode’s BeginPlay
Blueprint Playback Control
If not using Auto Play, control playback via Blueprint nodes:
Event BeginPlay (or any trigger event)
    │
    ▼
AnimatedTextBlock reference
    │
    ▼
Play node
Complete playback control nodes:
| Blueprint Node | Effect |
|---|---|
Play | Start character-by-character reveal |
Pause | Pause |
Resume | Resume |
Stop | Stop and reset — all characters hidden again |
SkipToEnd | Skip animation — instantly show all text |
Binding Character Reveal Events
In the Widget Blueprint’s Event Graph:
AnimatedTextBlock widget
    │
    ├─ [OnCharacterRevealedBP] ──► Print String (format: "Revealed {RevealedCount} characters")
    │
    └─ [OnAnimationCompleteBP] ──► Print String ("Animation complete!")
The RevealedCount parameter on OnCharacterRevealedBP indicates the total number of characters revealed so far. Use it to update a UI progress bar, trigger sound effects (with UEventSoundComponent), or unlock a “skip” button.
Rich Text Multi-Animation Blending
Use case: RPG dialogue — NPC names fading in, dialogue body typing out, keywords bouncing in with highlights. Uses the UAnimatedRichTextBlock widget with inline animation tags to apply different animations to different text segments.
Creating Two Animation Blueprints
Create two animation blueprints following the steps from the previous section:
TABP_Our_Typewriter — Typewriter effect (same configuration as above)
TABP_Our_BounceIn — Bounce-in effect:
| Track | TrackType | Keyframes |
|---|---|---|
| Opacity | Opacity | bInvertOpacity=true, Key 0: (0.0, 1.0) |
| Translation Y | Translation | Key 0: (0.0, (0, -20)), Key 1: (0.15, (0, 0)) — drops in from 20px above |
| Scale | Scale | Key 0: (0.0, (0.8, 0.8)), Key 1: (0.15, (1, 1)) — springs back from 80% |
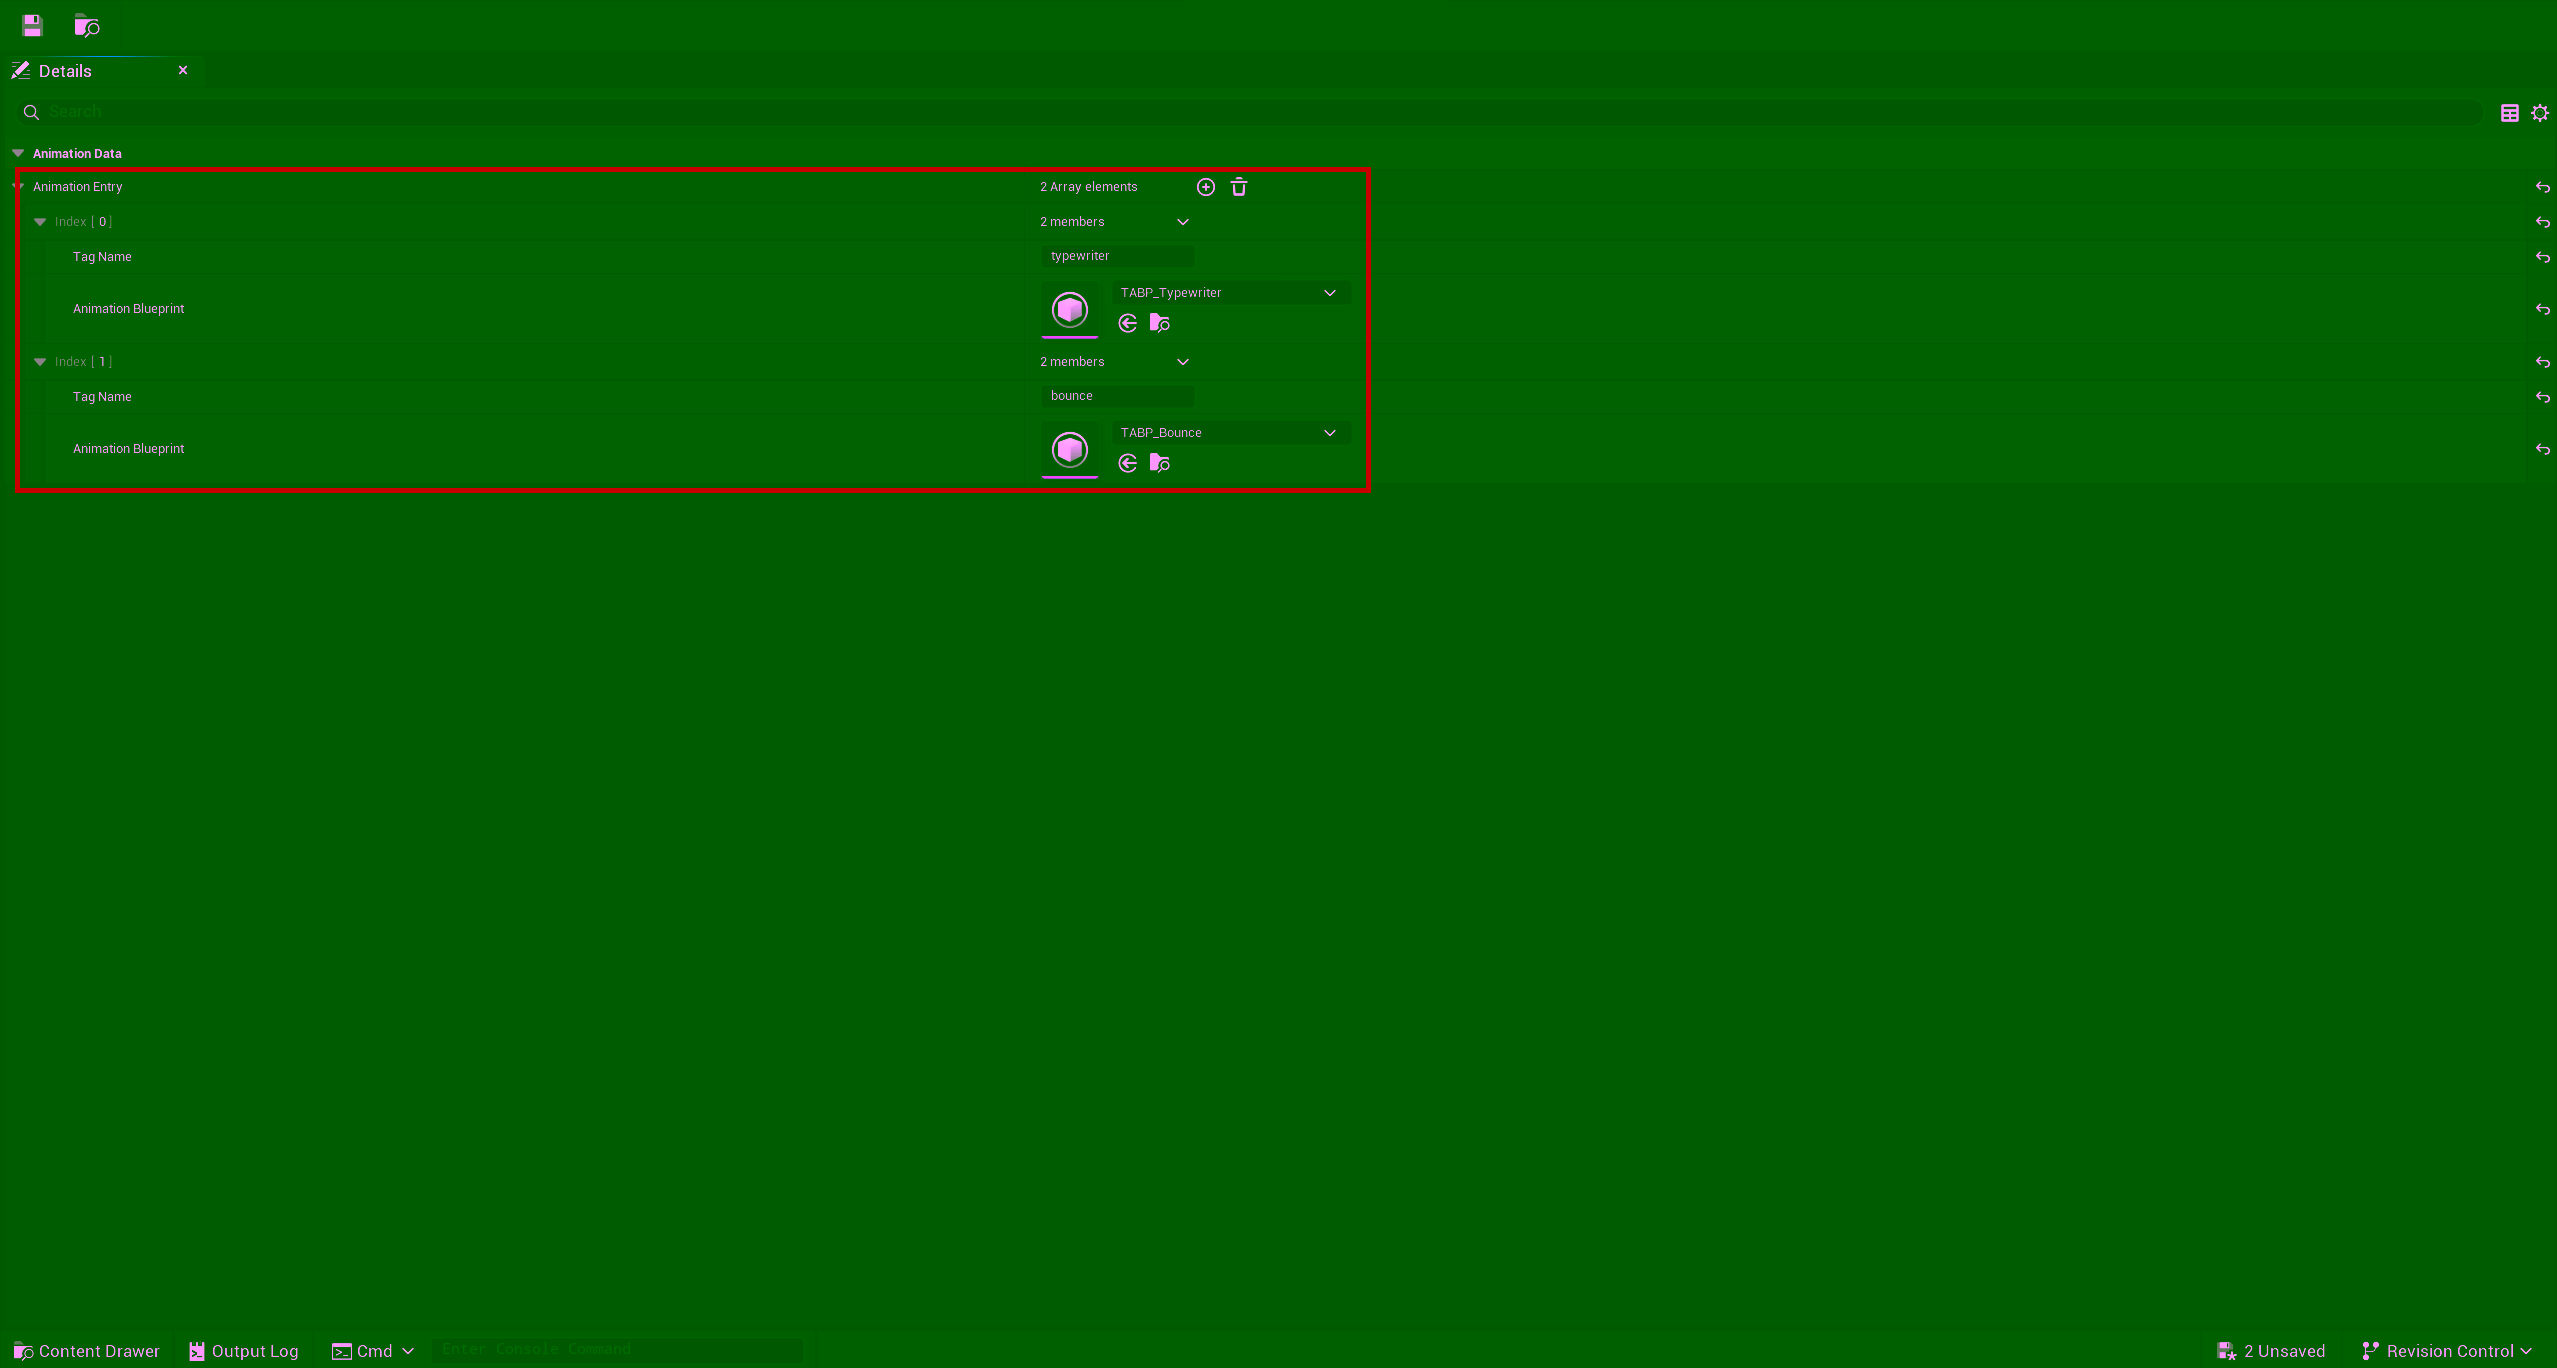
Creating an Animation Data Asset
-
Right-click in the Content Browser → Miscellaneous → Data Asset
-
Select
Text Animation Data Assetas the class -
Name it
DA_Dialog -
Open the Details panel and add two entries to the
Animation Entriesarray:Animation Entry Tag Name Animation Blueprint 0 typewriterTABP_Our_Typewriter1 bounceTABP_Our_BounceIn
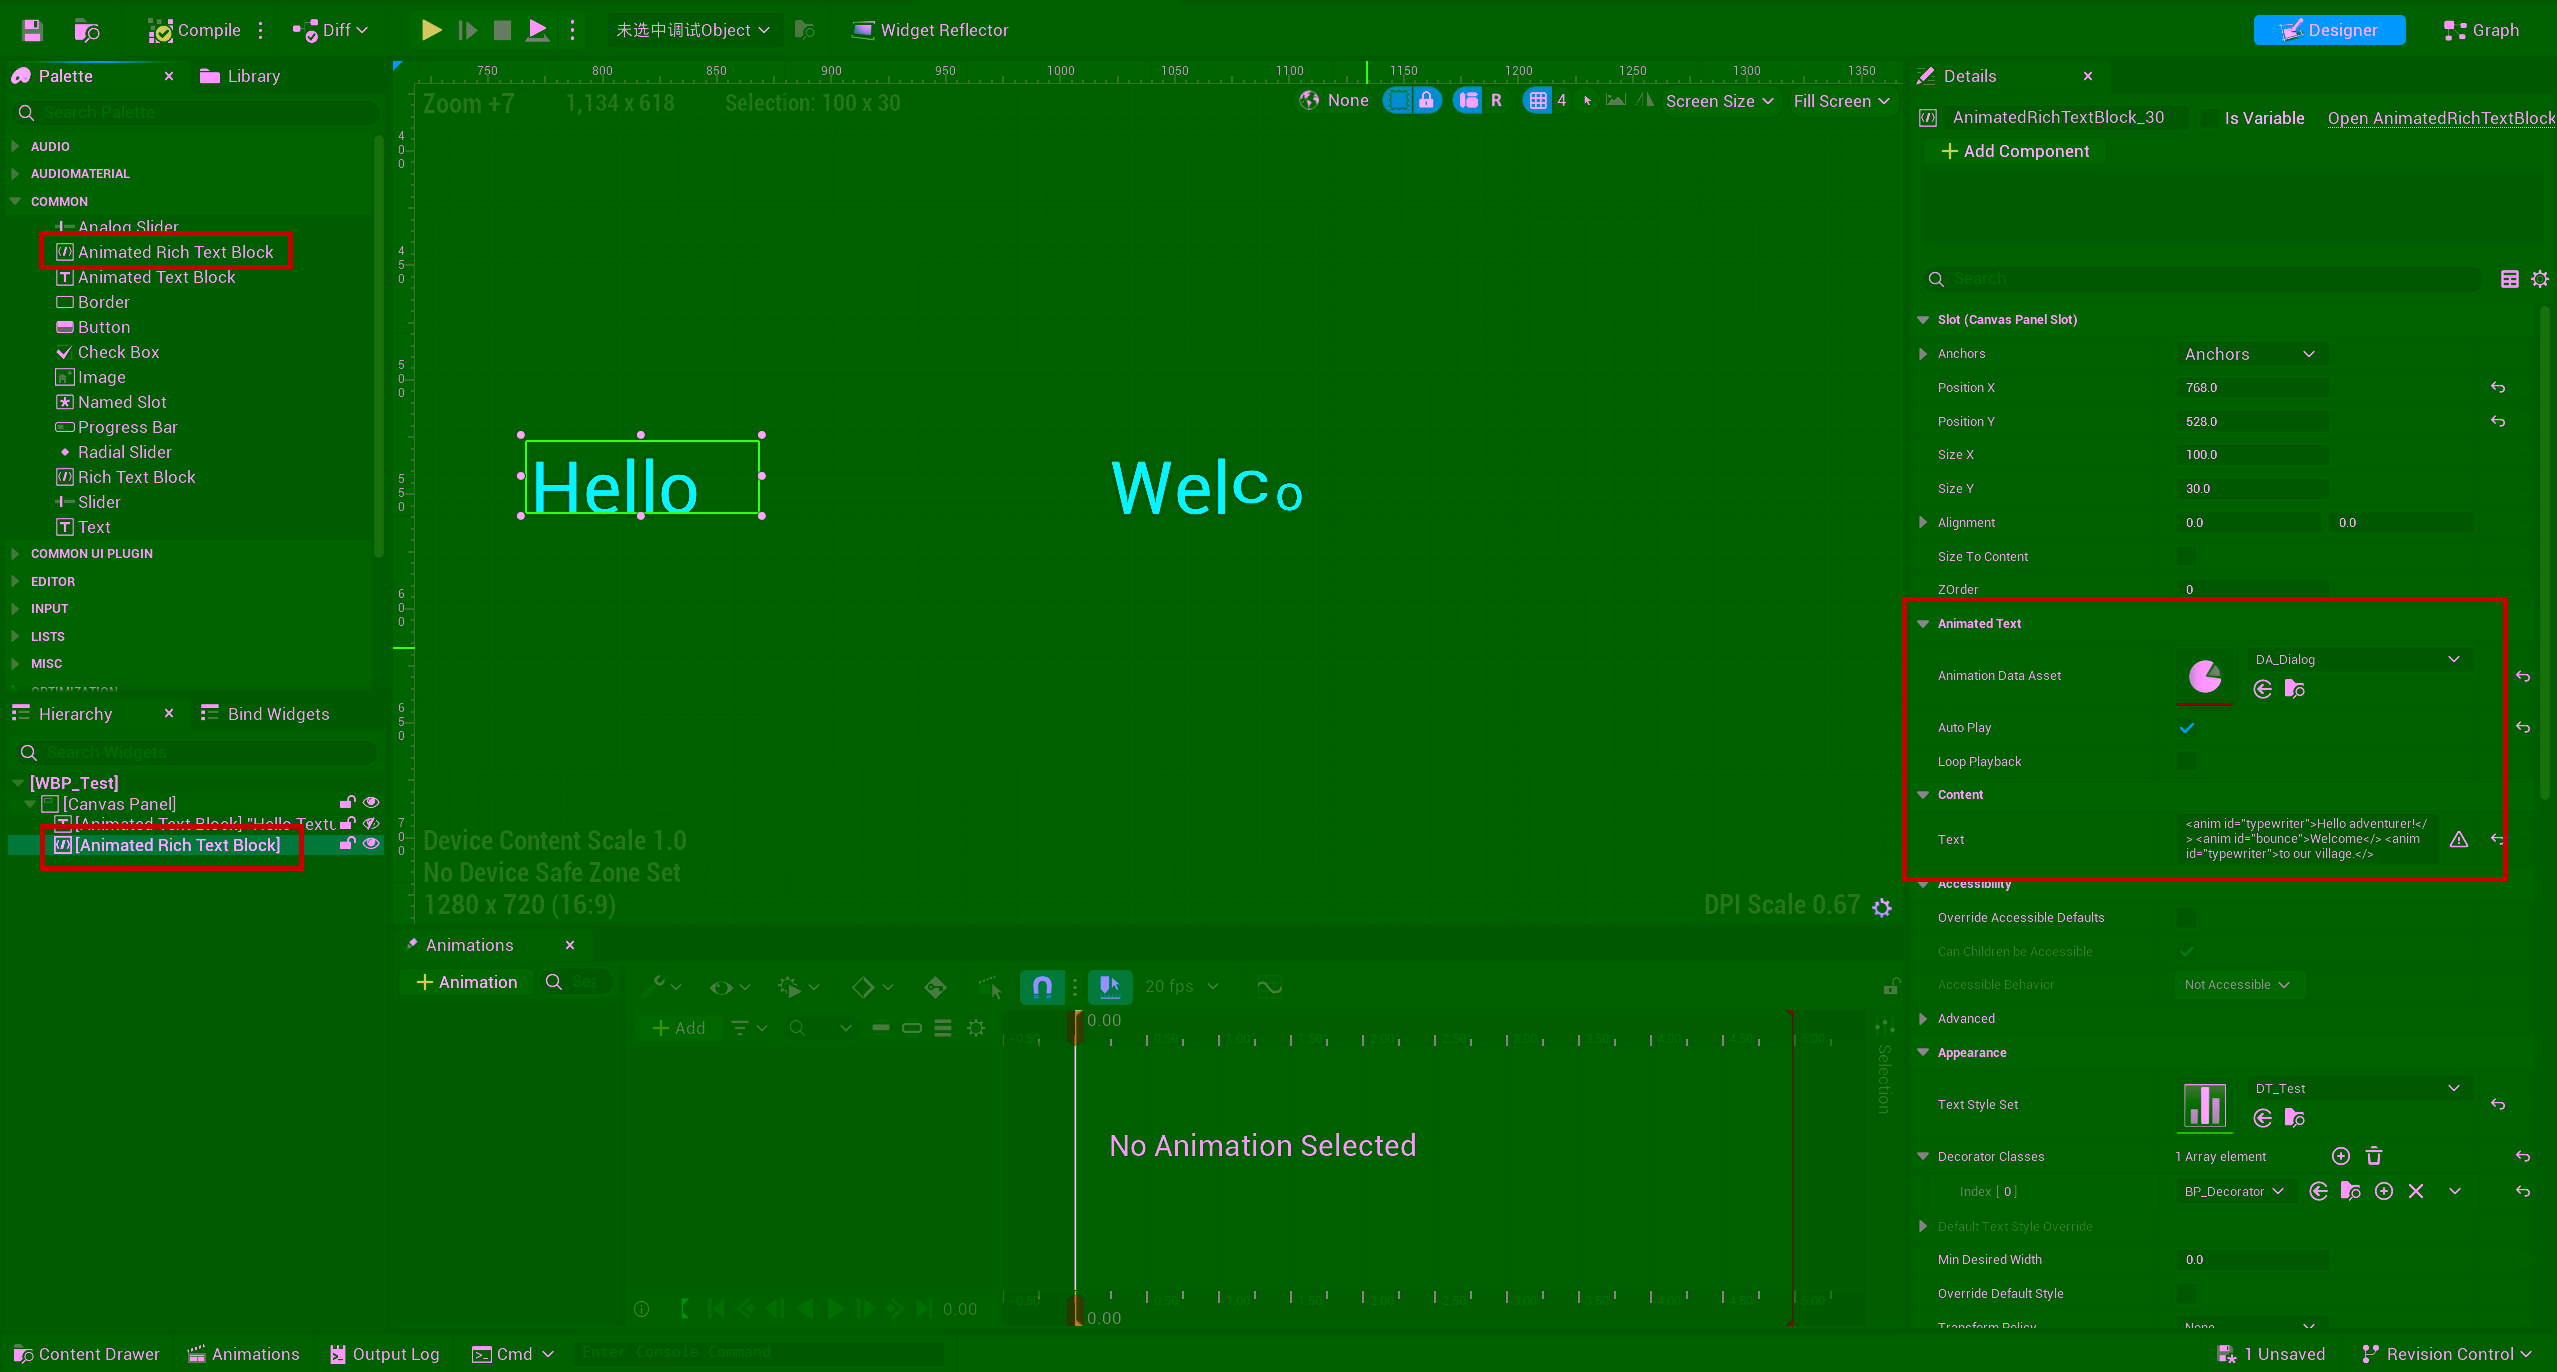
Using in UMG
-
Open a UMG Widget Blueprint
-
Drag Animated Rich Text Block from the Palette
-
Configure in the Details panel:
Property Value Animation Data AssetDA_DialogAuto PlaytrueTextSee below -
Text content — using inline animation tags:
<anim id="typewriter">Hello adventurer!</><anim id="bounce">Welcome</><anim id="typewriter">to our village.</>
Parsing rules:
- Text inside
<anim id="typewriter">...</>uses the typewriter reveal effect - Text inside
<anim id="bounce">...</>uses the bounce-in effect - Text not wrapped in any animation tag appears immediately without animation
Mixing Standard Rich Text Styles
Animation tags can be mixed with the engine’s built-in rich text style tags:
<anim id="typewriter"><textstyle>Hello adventurer!</><img id="Image" /></>Tag nesting rules:
- Animation tags can wrap style tags
- Style tags cannot wrap animation tags
- Both tag types are parsed independently and do not interfere
Runtime Dialogue Switching
Dialogue systems typically need to update text content dynamically:
Function: ShowDialog

    │
    ▼
AnimatedRichTextBlock → SetText
    │
    ▼
AnimatedRichTextBlock → Play
    │
    ▼ (bind completion event)
OnAnimationCompleteBP
    │
    ▼
Show "Continue" prompt
Playback Control Timeline
Play
  │
  ▼
Animator::StartAnimating
  │
  ├─ Compile pipeline (ExecutePipeline / ExecutePipeline_RichText)
  ├─ Calculate timing parameters (Duration / CPS)
  │
  ▼
Per Tick:
  Animator::TickAnimation(DeltaTime)
    │
    ├─ AdvanceFrame
    │   ├─ Advance frame index
    │   └─ Reveal next character → Broadcast OnCharacterRevealedBP
    │
    ├─ UpdateCurrentFrameDataCache
    │   └─ Refresh per-character FAnimationFrameData
    │
    └─ Slate::OnPaint consumes cache → per-character rendering
  │
  ▼ (final frame)
OnAnimationCompleteBP broadcast
  │
  └─ If bLoopPlayback=true → OnLoopRestart → continue from start
Debugging Tips
| Problem | Diagnosis |
|---|---|
| Animation not playing | Check that Auto Play is true, or confirm Play was manually called |
| Characters all appear instantly | Confirm opacity track has Invert Opacity=true |
| Text inside animation tags has no animation | Check that the tag name matches exactly (case-sensitive) in the Animation Entries array |
| Rich text style tags not working | Confirm URichTextBlock’s Text Style Set property has a style data table configured |
| No animation in editor preview | Click Compile, then drag the Sequencer playhead in the designer viewport |